Gameboy Advance Programming for Beginners - Loirak DevelopmentLoirak -> Gameboy -> GBA Development |
||
Gameboy Advance Programming for BeginnersHave you ever dreamed of becomming a game programmer? Today is your lucky day, becuase if you go through the following steps. I bet you will be making games before the day is over. By the time you finish reading this page you will have the basics that will enable you to build homebrewn games that will give give professional developers a run for their money. (well maybe not professional developers, but its a start!). This tutorial will cover Nintendo's new Gameboy Advance. If you want older information about coding for the Gameboy Color visit gbprog.phpThis tutorial will cover the basics from downloading the compiler (devkitadv), installing it, setting it up, making roms, and programming basic graphics on the gameboy. But there are a few prerequisites. You need to know how to download and extract zip files from the internet. Second, you should be able to think logically (some programming experience is recommended), and finally be familiar with a few DOS concepts like paths, file organization, and directories. If you do not know how to use a Zip program, or the basics of DOS then you will have a difficult time getting through this tutorial, so first learn those things before reading on. Step 1 - Setting up the Environment1.1 - Installing the CompilerAs they say in German, "Aller Anfang ist schwer" (the hardest part is getting started). Setting up the compiler, and getting the hardware or emulator is probably the hardest and most fustrutating thing for beginners. In fact a lot of people get so fustrated that they give up. Well, in writing this tutorial my aim is that you can get up and compiling your games in no time. So let's get started.The best part about programming for the GBA is that the GBA community is sort of one nice family. A lot of people share their work and knowledge to help other newbies out. So when you finally get to the point of making demos or games please share your knowledge with others. If you don't have your own web site to post to, there already exists a couple great forums where you can post your work or discovery about the GBA. Like gbadev.org. One person to make a very significant contribution is Jason Wilkins. He has put together the unoffical GBA software development kit, known simply as devkit advance. Go to this address http://devkitadv.sourceforge.net/, then the download page. Download the following files to your hard drive. The MacOS folks will need to go to gnufoo.org/gba to get the developer kit. The Linux people can get the DevKitAdvance from the same place as the windows users they will just need to download different files. The files are in the Release 4 distribution.
If you are using Windows 9x/Me here is what Jason Wilkins has to say about the devkitadv, and the last patch file for Win9x users.
In Windows 2000/XP right click my computer, goto properties. Click the advanced tab, and then
click on environment variables. In the system variables scroll down to path, and then click edit.
Make sure it ends with a semi-colon ";", then add C:\devkitadv\bin
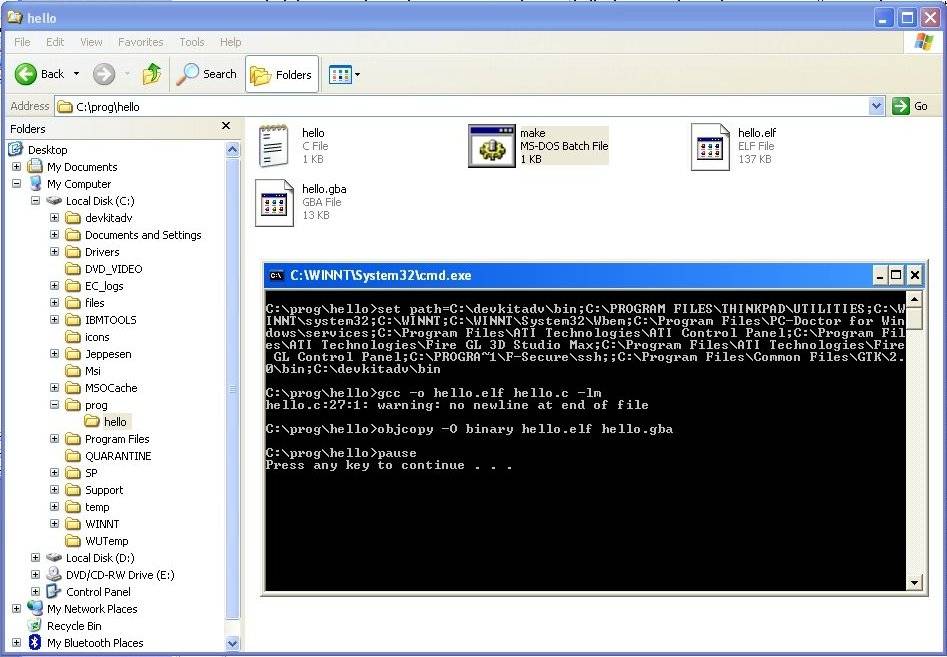
set PATH=c:\devkitadv\bin;%PATH%
cmd          **** win 2000/NT/XP users
command      **** win 9x/Me users
Now, in notepad click Save As, change the save as type to All Files. I am going to say that last part twice because otherwise it will not work, so when in the Save As menu change the save as type to All Files. Finally type in the filename filename "C:\devkitadv\start.bat" and click save. Now browse to this C:\devkitadv folder using windows explorer, and double click on the startup.bat file, a command prompt (DOS prompt) window will show up. Now type "exit" and press enter to close the command prompt window. You can compile your programs from here, and use the other gcc tools since the path is setup for this window. Note that if you are bone headed and decided to install the devkitadv to a different directory you will need to define GCC_EXEC_PREFIX environment variable using the following line set GCC_EXEC_PREFIX=c:/devkitadv/lib/gcc-lib/ where Where c:/devkitadv/ is the installation directory. Use forward slashes. The trailing slash is required. PLEASE NOTE most users do not have to do this. Only do this if you have problems compiling your first rom, which is what we are going to do right now!
1.2 - Making our first ROMThat should be it for setting up the devkitadv, so let us make our first program or Rom, but before we make that program. We need something to view it. I assume that since you want to program for the gameboy advance, that you own a gameboy advance. If so you might want to invest in a flash writer and cart from Success-HK.com or Linker4u.com. They allow you to put your own games on a rewritable cartrige, and then play it on a real gameboy advance. The other option is an emulator. This is not really an option, since anyone who programs knows that it takes too long to load your rom onto the writer every time you want to test it. So the best thing to do is to get an emulator. This way you can test your program on your windows machine, right after you make it. The best emulator out there is VisualBoyAdvance at http://vba.ngemu.com/. Go to the download page and get it!Now onto making the first rom, first of all we need to make a directory for storing your files that you make or your source code. I store my code in a directory called "C:\prog". You can store yours anywhere you want, but if you would like to follow the path of least resistance, and follow my example click My Computer or open windows explorer click on your C drive. On the right hand side you should see folder icons for program files windows or winnt, etc. Click file, new folder and type in the name "prog". Now go into this folder. Make a directory inside this one called "hello" by following the same routine. Go inside of the hello folder. Now serparately open up notepad and type in the following. Or just copy and paste:
/* hello.c - Gameboy Advance Tutorial - Loirak Development */
#define RGB16(r,g,b)  ((r)+(g<<5)+(b<<10))

int main()
{
	char x,y;
	unsigned short* Screen = (unsigned short*)0x6000000;
	*(unsigned long*)0x4000000 = 0x403; // mode3, bg2 on

	// clear screen, and draw a blue back ground
	for(x = 0; x<240;x++)   //loop through all x
	{
		for(y = 0; y<160; y++)  //loop through all y
		{
			Screen[x+y*240] = RGB16(0,0,31);
		}
	}

	// draw a white HI on the background
	for(x = 20; x<=60; x+=15)
		for(y = 30; y<50; y++)
			Screen[x+y*240] = RGB16(31,31,31);
	for (x = 20; x < 35; x++)
		Screen[x+40*240] = RGB16(31,31,31);

	while(1){}	//loop forever
}
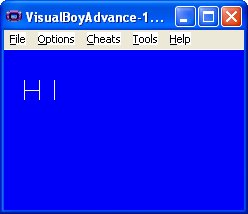
Now in notepad, click save as, then make sure to go into the prog\hello directory, change the save as type from text documents to All files, and type in the file name "hello.c" Now in notepad, click file then new (to make a new file), paste or type the following. set path=C:\devkitadv\bin;%path% gcc -o hello.elf hello.c -lm objcopy -O binary hello.elf hello.gba pauseIn notepad, click save as, then make sure you are in the prog\hello directory, change the save as type from text documents to All files, and type in the file name "make.bat" Close notepad, then using windows explorer, or my computer to navigate to that directory, and double click "make.bat" Assuming no errors were reported. Your folder should now have two new files. An elf file, and "hello.gba". Now open your recently downloaded copy of VisualBoyAdvance, and open hello.gba, you should get a blue screen, with HI written on it. See pictures below. Your first Game, ROM, whatever you want to call it. You should be proud of yourself. You have successfully downloaded the compiler, an emulator, set everything up, and made your first program!
Step 2 - Basic Graphics on the GBA SystemIf you don't know C Programming the following explanations about the hello program, and the GBA system maybe a bit hard to follow. We have here a short tutorial on C programming basics at www.loirak.com/prog/ctutor.php, which will help you to understand some of the information about the gameboy advance that is to follow. If you already program in C, more power to you, and just continue reading this document.This might be information you already know, but let's talk about the GBA. The Gameboy Advance has a 32bit ARM7TDMI processor running at a blazing 16.78Mhz. The GBA is roughly equivalent to the SNES, and perhaps a bit better. The GBA has six different graphics modes, and a max resolution of 240 pixels wide, by 160 pixels tall. It has 96k of video memory (which sounds pretty pathetic compared to my GeForce 4 with 128Mb). But my GeForce 4 is bigger than the Gameboy, and has to have its own fan. The GBA also has 256K external ram. Commerical catrige sizes (games you buy) are generally 32Mbit (4MB) or 64 Mbit (8MB). Now lets talk more about the graphics modes. The first three modes 0,1,2 are tile modes. Basically the graphics are organized into 8x8 pixels sections, and maps are passed to the GBA to be drawn. Tile modes are a little more complex than the other three modes. So this tutorial isn't going to cover them. If you want to learn more about tile modes visit The Pern Project. The next three modes are bitmap modes. The below table describes the three modes.
Now that we know how the bitmap modes are made up. Lets discuss the Hello program we wrote when we were setting up the compiler. After declareing variables x and y, we make a variable called Screen which is a unsigned short (also known as u16). Screen is a pointer to memory location 0x6000000. This location in memory is that start of VRAM. The line after this we assign the hex value 0x403 to memory location 0x4000000. Location 0x4000000 in memory is a graphics register, perhaps the most important one. Registers our special memory locations on the GBA. When you put different values into these registers, different things will happen. The register talked about here controls the graphic modes of the Gameboy. It is usually referenced using a #define and named REG_DISPCNT. Here is a description of this 16 bit register taken from the Cowbit Hardware Spec: Address: 0x4000000 - REG_DISPCNT (The display control register) R
F E D C B A 9 8 7 6 5 4 3 2 1 0
W V U S L K J I F D B A C M M M
0-2 (M) = The video mode. See video modes list above.
3 (C) = Game Boy Color mode. Read only - should stay at 0.
4 (A) = This bit controls the starting address of the bitmap in bitmapped modes
and is used for page flipping. See the description of the specific
video mode for details.
5 (B) = Force processing during hblank. Setting this causes the display
controller to process data earlier and longer, beginning from the end of
the previous scanline up to the end of the current one. This added
processing time can help prevent flickering when there are too many
sprites on a scanline.
6 (D) = Sets whether sprites stored in VRAM use 1 dimension or 2.
1 - 1d: tiles are are stored sequentially
0 - 2d: each row of tiles is stored 32 x 64 bytes in from the start of the
previous row.
7 (F) = Force the display to go blank when set. This can be used to save power
when the display isn't needed, or to blank the screen when it is being
built up (such as in mode 3, which has only one framebuffer). On the SNES,
transfers rates to VRAM were improved during a forced blank; it is logical
to assume that this would also hold true on the GBA.
8 (I) = If set, enable display of BG0.
9 (J) = If set, enable display of BG1.
A (K) = If set, enable display of BG2.
B (L) = If set, enable display of BG3.
C (S) = If set, enable display of OAM (sprites).
D (U) = Enable Window 0
E (V) = Enable Window 1
F (W) = Enable Sprite Windows
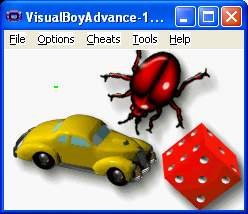
There are few things things important here to notice. Bits 0-2 control the mode. Also note that in bitmap mode we have to enable BG2. All the other stuff relates to tile modes or sprites which is beyond the scope of this tutorial. So now you can figure out why we set this register to the hex value 0x403. If you convert this to binary and match up each bit. You will see that 0x403 would turn bit 10(A), and bits 2 & 1 on. So our sample program enables background 2, and sets the mode to 3. This sets GBA to its third graphics mode. As talked about earlier mode three has a screen width of 240x160, and each pixel has 16bits of information. These sixteen bits are used to assign a color. In the Hello program, at the top you notice the following define #define RGB16(r,g,b) ((r)+(g<<5)+(b<<10)) (also known as a macro). As you notice it takes the blue that comes in, shifts it up 10 bits, takes the green and shifts it up 5 bits, and finally adds in the red value. So every pixel has five bits of each primary color. The values that you can use range from 0..31 (since 2^5=32). So for example if you wanted to change the pixel at location at X=10, Y=15. The code would look like this. Screen[ 10 + 15*240] = RGB16(0,31,0); Memory for graphics is organized linearly, the first 240 pixels starting from memory address 0x6000000 represent the first line on the screen where y is 0, and x ranges between 0 and 239. To get to the next line on the screen, and draw on it. We simply adding the screen width multiplied by the Y that we want to get to. So in the code above we want line fifteen so we had 10 to 15 times 240. Very simple, eh. Now if you look at the Hello program you should be able to understand everything. First we clear the background to blue. Then we draw a couple lines to write HI to the screen. Now that you know how to work around in mode3, I recommend change some things in the hello program, and trying to do some other stuff on your own. The best way to learn to program for the GBA is not to read about it, but to DO it. Back so soon, ok, now we'll take a quick look at mode4. Mode 4 as mentioned above has the same resolution as mode3, but it can display a max of 256 colors at once, and uses a palette. Since it can only have 256 colors. We only need 8 bits per pixel, therefore when we draw stuff to the GBA it is twice as fast as Mode3. In fact DOOM GBA is written in this graphics mode. So to draw something in mode 4 we simply write which number 0..255 that the pixel represents into the screen buffer. But also note mode 4 has two screen buffers. Since it takes up half the space as Mode3. So one can be displayed, and you can be changing the other, allowing animation to look a lot smoother than it could in mode3. Our next program is again quite simple, it has a couple new things, first it takes a whole image
made from a conversion tool, and displays it to the screen. It has keyboard input to move a block
around on the screen. The data that is displayed to the screen is stored in a header file. This header
file is generated by a program called pcx2gba.exe made by Dovoto, and taken from his Pern Project.
It takes a PCX file that has 256 colors, and generates a C array for the image, and palette. Then the
code below takes the information like the palette, and actual image, and draws it to the screen. After
it is drawn to the screen. It reads the keyboard input, draws a flashing green block on top of the image. Here is the main
code for this small program (you can download it here - display.zip (66k)) This file
includes display.c, keypad.h, ppic.pcx, ppic.h, display.gba, and make.bat.
// display.c : sample program to display pcx, and get key input
typedef unsigned short u16; // two type definitions
typedef unsigned long u32;

#include "keypad.h"		//keypad definitions
#include "ppic.h"

#define REG_DISPCNT    *(u32*)0x4000000
#define MODE_4 0x4
#define BG2_ENABLE 0x400
u16* paletteMem = (u16*)0x5000000;	// Pal is 256 16 bit BGR
u16* videoBuffer = (u16*)0x6000000; // video memory

void PlotPixel(int x,int y, unsigned short int c)
{
	videoBuffer[(y) *120 + (x)] = (c);
}

int main(void)
{
	int x, y, blockX, blockY, loop; // variables

	REG_DISPCNT = MODE_4 | BG2_ENABLE; // switch to mode4
	for(loop = 0; loop < 256; loop++)	// put pal in memory
		paletteMem[loop] = picPalette[loop];

	blockX = 50;	// give our block a start position
	blockY = 50;

	while (1) // run forever
	{
		// process input
		if(!((*KEYS) & KEY_UP)) // they pushed up
			blockY--; // subtract from y (move up)
		if(!((*KEYS) & KEY_DOWN))
			blockY++;
		if(!((*KEYS) & KEY_LEFT))
			blockX--;
		if(!((*KEYS) & KEY_RIGHT))
			blockX++;
		// draw the picture
		for(y = 0; y < 160; y++)
		{
			for(x = 0; x < 120; x++)
			{
				PlotPixel(x,y,picData[y*120+x]);
			}
		}
		PlotPixel(blockX, blockY, (75<<8)+75);
		PlotPixel(blockX+1, blockY, (75<<8)+75);
		PlotPixel(blockX, blockY+1, (75<<8)+75);
		PlotPixel(blockX+1, blockY+1, (75<<8)+75);
	}
	return 0;
}
Explanation. Well it is easiest to start at the top. First we define some simple types that
are common when programming with the GBA. u32 means unsigned (only can store positive numbers)
32 bit variable, and u16 would be a unsigned 16bit variable. These are used by the header file
which is generated by pcx2gba. To insert a different picture (like one you made). All you need
to do is make a picture in your favorite graphics program and then overwrite ppic.pcx (from
the display.zip file) Then run from dos in the same directory as all the code,
and graphics.
pcx2gba ppic.pcxThen it will generate a header file. Which as you notice from display.c is included on the sixth line of the program. You will also notice we include another file called keypad.h. This is also in the display.zip file. Here is the file: //Key Definitions from Nokturn's key demo #define KEY_A 1 #define KEY_B 2 #define KEY_SELECT 4 #define KEY_START 8 #define KEY_RIGHT 16 #define KEY_LEFT 32 #define KEY_UP 64 #define KEY_DOWN 128 #define KEY_R 256 #define KEY_L 512 int* KEYS = (int*)0x04000130;As you can see it has some defines for which bits correspond to each button pressed. It also defines the KEYS register which is located 0x4000130. Basically to see if a certain key is pressed, you examine the contents of this register, and see if the corresponding bit is on or off. As in the display.c if we wanted to see whether the button up was being pressed we would use the following line. if(!((*KEYS) & KEY_UP)) // up was pressedAfter the inclusion of keypad.h we have a few more things defined. We define the REG_DISPCNT, MODE_4, BG2_ENABLE which was explained earlier. Next we define the location of both video memory, and palette memory. Video memory for Mode4 starts at the same place as with Mode3. But with Mode4 we need some space for the palette. The palette is a 256 16bit RGB entries. Using the RGB or BGR format we talked about above. If you wanted to change an entry in the palette then you could use the RGB16 macro that was in the Hello program. In the above program we simply copy each entry into the gba palette from the one the PCX file made. Lastly we have the PlotPixel function. This takes a X, Y, and a color number which is the palette number that you want the pixel to be. You may notice that we multiply Y by 120 instead of buy 240 as in Mode3. This is because in Mode4 each pixel is represented by only 8 bits (one byte). But video memory is always written in 16 bit chunks. So 16 bits will hold two pixels. So each line would be 240/2 or 120. This is also why as you notice in the program that when I wrote the moving block to the screen. The color I give is 75 shifted up 8 bits, plus 75. This tells PlotPixel to write to pixels two the screen of palette entry 75 to the screen. That should enough for you to understand the sample program. It is really simple, but think about what you now know. You can use two modes on the GBA, get keyboard input, and also draw graphics that you yourself made to the screen. That is a lot. In fact, that is enough to make a simple game. Don't believe me? well, goto tank.php download the program and see for yourself. That about wraps it up for this tutorial, it was only meant to cover the basics and get you started. I recommend going through the tutorial twice to get the information down, and then writing some of your own sample programs. Take a look at Tank every thing in this program you should be able to understand, or wade your way through. Good luck in your programming efforts. Here are some more web links for when you want to get more advanced. Other ResourcesNow that you've made a very simple game, I would say your a fairly accomplished GBA hobbyist. The next part is too get aquainted with interrupts, tile modes, and sound. But that is beyond the scope of this tutorial. So good luck, and here are some sites to help you out on your development journey.
|
|
|||||